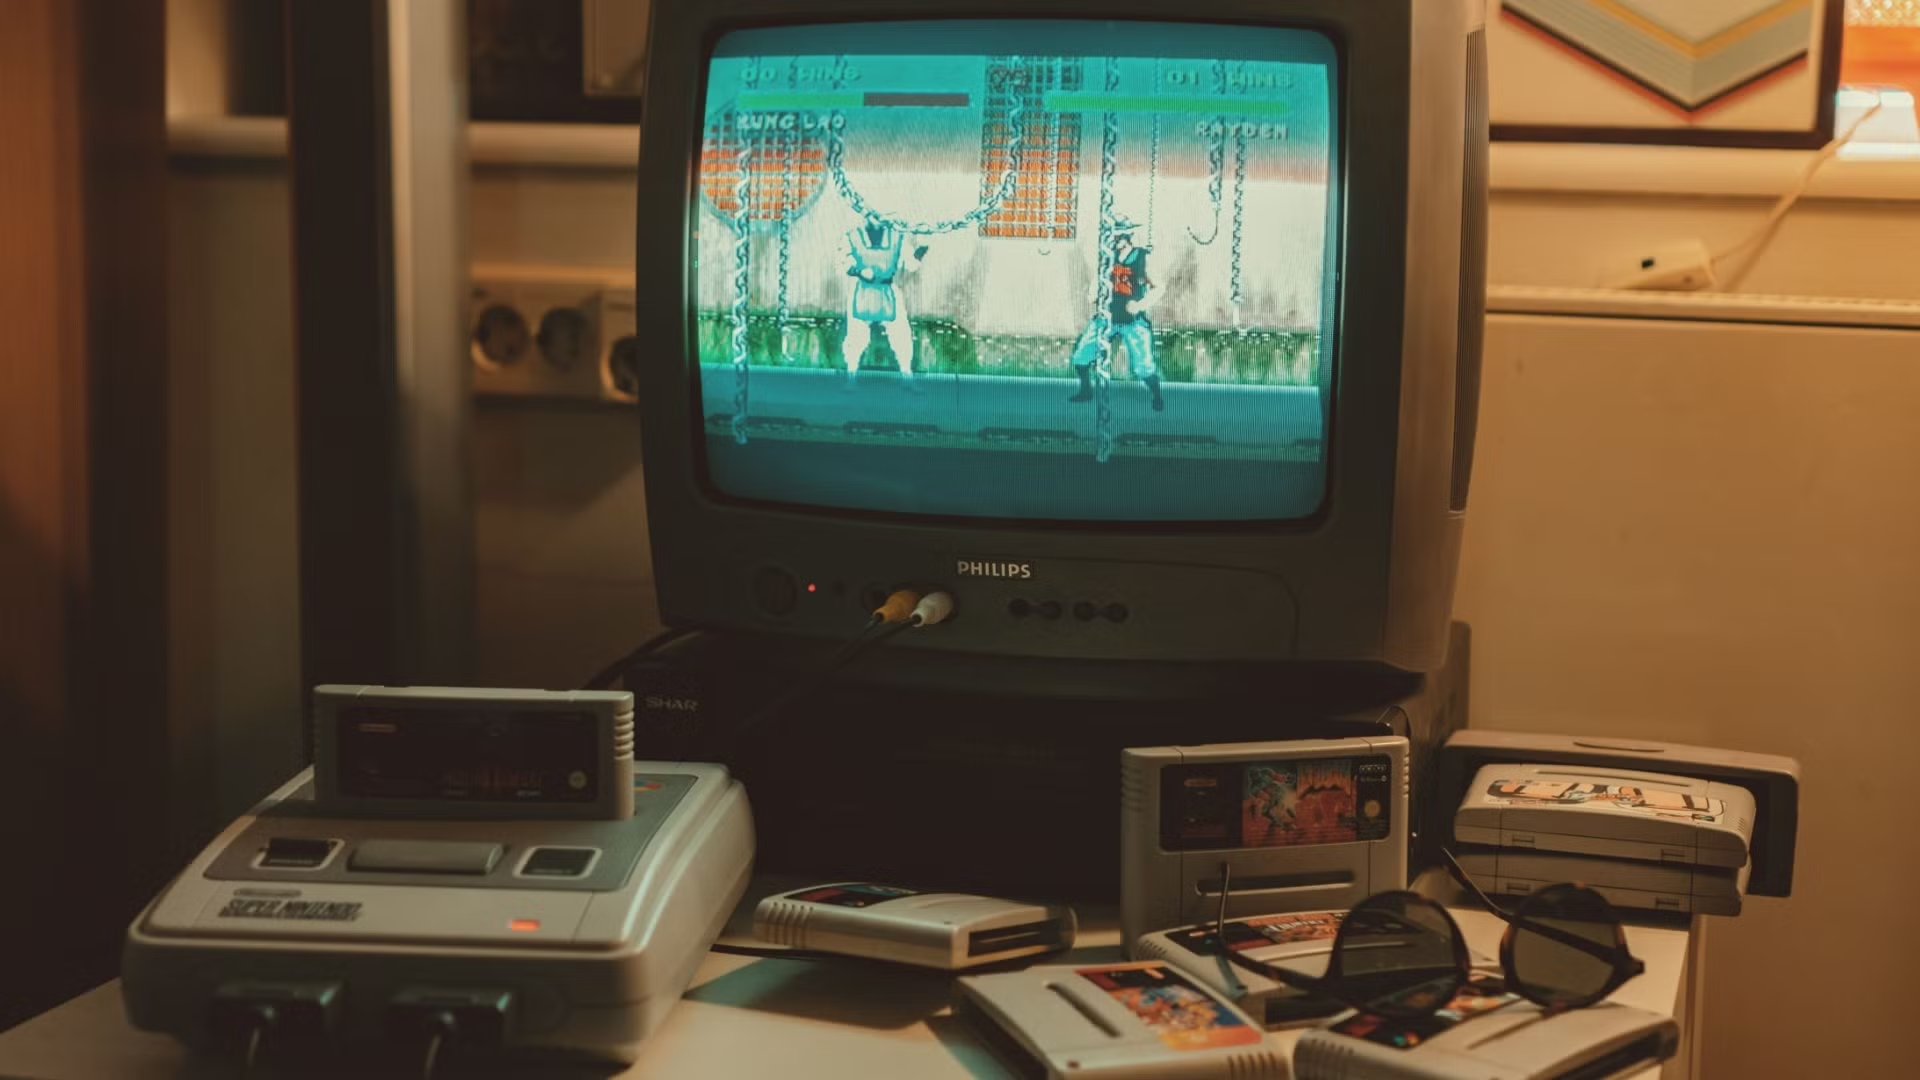
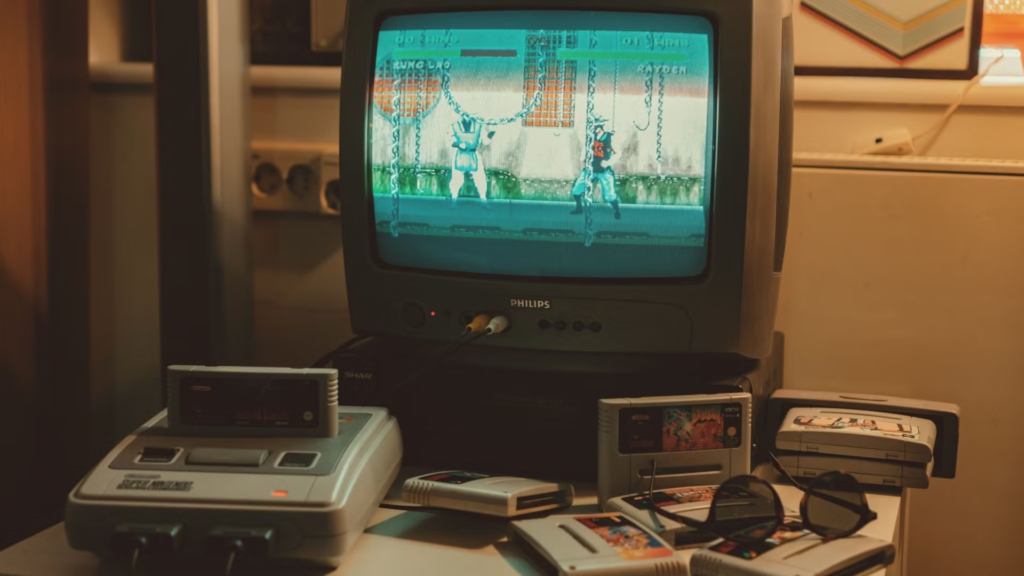
Learning how to connect SNES to a CRT TV is one of the most rewarding steps you can take in retro gaming – and knowing how to connect SNES to a CRT TV properly makes the difference between a blurry composite picture and the sharp vibrant RGB image you never knew you wanted.
The good news is that the SNES supports multiple output types natively – no mods required – making it one of the easiest retro consoles to get looking great on a CRT straight out of the box.
What You Need to Connect SNES to a CRT TV
Before diving into the step by step process of how to connect SNES to a CRT TV, check which inputs your CRT has available – this determines which cable option is right for your setup.
- RF input – the circular screw-type connector. Avoid if possible.
- Composite inputs – the yellow, red and white RCA connectors. Found on almost every CRT.
- S-Video input – a small round multi-pin connector, often labelled S-Video or Y/C.
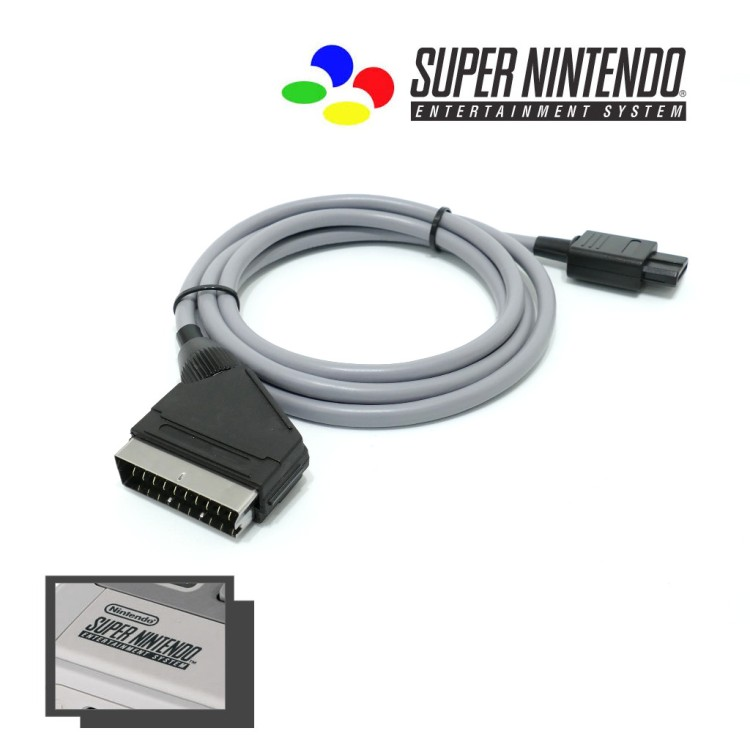
- SCART input – a large rectangular connector common on European CRT TVs. Supports RGB for the best possible picture.
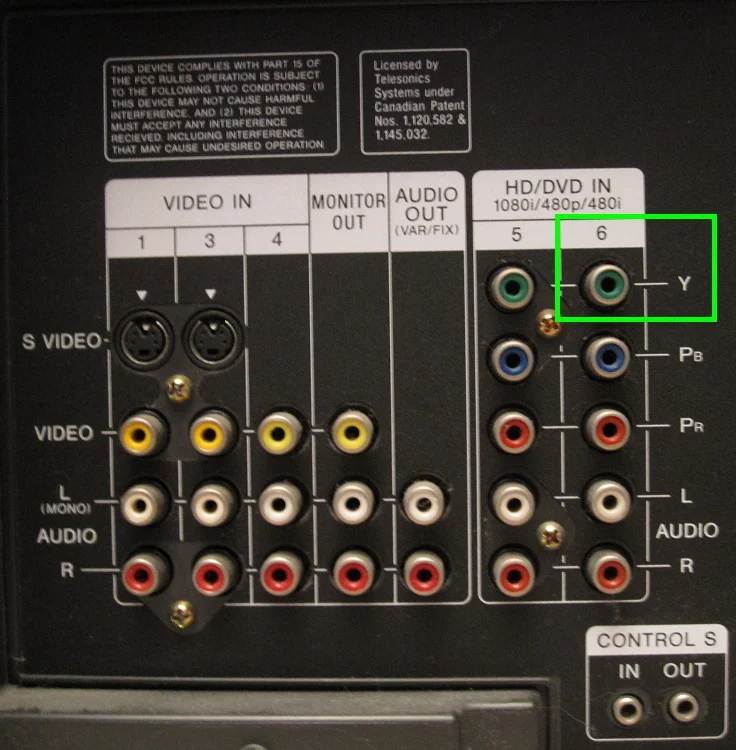
- Component inputs – three connectors labelled Y, Pb, Pr. Less common on CRTs but found on higher-end consumer sets.
The SNES connects via a Multi AV connector on the back of the console – the same port style used across most Nintendo consoles of the era. All cables for the SNES use this port.
SNES to CRT TV – Cable Options Compared
| Cable type | Signal quality | SNES compatible | CRT input needed | Recommended |
|---|---|---|---|---|
| RF | Very poor | Yes | RF aerial input | Avoid |
| Composite RCA | Poor | Yes – stock cable | Yellow RCA | Starting point only |
| S-Video | Good | Yes – native | S-Video port | Great budget upgrade |
| RGB SCART | Excellent | Yes – native | SCART socket | Best for European CRTs |
| Component YPbPr | Excellent | Yes – native | Component inputs | Best for US CRTs |
How to Connect SNES to a CRT TV – Step by Step
Option 1: Composite (The Default Setup)
Composite is the cable that came in the box with most SNES consoles and works on virtually any CRT TV with RCA inputs. It is not the best signal available but it is a perfectly valid starting point while you source better cables.
- Plug the Multi AV end of the cable into the back of your SNES.
- Plug the yellow RCA connector into the yellow Video input on your CRT.
- Plug the red and white RCA connectors into the red and white Audio inputs.
- Switch your CRT to the correct AV input channel using the TV remote or input button.
- Power on the SNES – the Nintendo logo should appear on screen immediately.
If you get no picture, cycle through the AV inputs on your CRT – most sets have multiple AV channels labelled AV1, AV2, AV3 and you may need to switch between them to find the active input.
Option 2: S-Video (The Easy Upgrade)
S-Video gives a noticeably sharper and cleaner image than Composite with minimal extra effort. If your CRT has an S-Video port this is the easiest and most cost-effective upgrade you can make to your SNES setup.
- Purchase a SNES S-Video cable – search “SNES S-Video cable” or “Super Nintendo Multi AV S-Video” on eBay or Amazon. Expect to pay $10-$20.
- Plug the Multi AV end into the back of your SNES.
- Plug the S-Video connector into the S-Video port on your CRT.
- Plug the red and white audio RCA connectors into the audio inputs.
- Switch your CRT to the S-Video input channel and power on the SNES.
The improvement over Composite is immediately obvious – colours are more saturated, edges are sharper, and the characteristic dot crawl of Composite is eliminated entirely. For most people S-Video represents the sweet spot between image quality and cost.
Option 3: RGB SCART (The Best Picture on European CRTs)
RGB via SCART is the best possible signal you can feed a CRT TV and the SNES supports it natively. If your CRT has a SCART socket – common on European and Australian sets – this is the connection to use for the absolute best SNES image quality.
- Purchase a SNES RGB SCART cable – search “SNES RGB SCART cable” on eBay or from specialist retailers like Retro Gaming Cables UK. Budget $20-$40 for a quality cable. Avoid cheap unshielded cables as they can introduce interference when used with an upscaler.
- Plug the Multi AV end into the back of your SNES.
- Plug the SCART connector into the SCART socket on your CRT.
- Switch your CRT to the SCART input – most European CRTs auto-detect SCART and switch automatically.
- Power on the SNES – the image should appear immediately in full RGB quality.
The difference between RGB SCART and Composite on a CRT is dramatic. Donkey Kong Country, Super Metroid, and Chrono Trigger in particular look exceptional via RGB – the colours are richer, the pixel art is sharper, and the overall image has a clarity and depth that Composite simply cannot deliver.
Option 4: Component (The Best Picture on US CRTs)
In North America where SCART was never common, Component video is the preferred high-quality connection for SNES on a CRT. Component gives equivalent image quality to RGB SCART and is found on higher-end consumer CRTs from the late 1990s and early 2000s.
- Purchase a SNES Component cable – search “SNES Component cable” or “Super Nintendo YPbPr cable” on eBay. Budget $15-$35.
- Plug the Multi AV end into the back of your SNES.
- Plug the Y (green), Pb (blue), and Pr (red) connectors into the matching Component inputs on your CRT.
- Plug the audio RCA connectors into the audio inputs.
- Switch your CRT to the Component input and power on the SNES.
SNES Cable Upgrade Path – Where to Start
Knowing how to connect SNES to a CRT TV is one thing – knowing which cable to prioritise first is another. Not sure which cable to buy first? Here is the recommended upgrade path based on your CRT and budget:
- Any CRT, zero budget – use the stock Composite cable. It works and gets you playing immediately.
- CRT with S-Video, small budget – buy an S-Video cable first. $10-$20 and the improvement is immediately noticeable.
- European CRT with SCART – go straight to RGB SCART. It is the best signal your CRT can accept and the SNES supports it natively.
- US CRT with Component inputs – buy a Component cable. Equivalent quality to RGB SCART and widely available.
- Basic CRT with only Composite – start here while you hunt for a better CRT with S-Video or SCART.
Troubleshooting – No Picture or Poor Image Quality
If you are having trouble after following the steps above on how to connect SNES to a CRT TV, work through these common fixes before assuming there is a hardware fault.
- Wrong input selected – cycle through all AV inputs on your CRT. Many sets have AV1, AV2, AV3 and it is easy to be on the wrong channel.
- Cable not fully seated – the Multi AV connector can feel loose on older SNES consoles. Make sure it is pushed in firmly.
- Faulty cable – cheap third-party cables are a common cause of no picture or colour issues. Try a different cable if available.
- SCART socket not RGB compatible – not all SCART sockets support RGB. Some older CRTs have SCART sockets that only pass Composite over SCART. Check your TV’s manual or look up your specific model online to confirm RGB SCART support.
- SNES region mismatch – a PAL SNES running on an NTSC TV or vice versa can cause no picture or rolling image. Make sure your console and TV are from the same region or that your TV supports both standards.
Frequently Asked Questions – How to Connect SNES to a CRT TV
These are the most common questions we receive about how to connect SNES to a CRT TV – answered based on real experience with multiple setups.
Does the SNES need a special cable to connect to a CRT?
No special cable is required to get started – the SNES came with a Composite cable that connects directly to any CRT with RCA inputs. However the SNES supports S-Video and RGB SCART natively, both of which give a significantly better picture. Upgrading your cable is the cheapest and most impactful improvement you can make to your SNES CRT setup.
What is the best cable for SNES on a CRT?
RGB SCART is the best cable for SNES on a European CRT with a SCART socket – the SNES outputs a clean native RGB signal that looks exceptional on a good CRT. For US CRTs without SCART, Component video gives equivalent quality. S-Video is an excellent middle ground that works on most CRTs and gives a noticeably better image than the stock Composite cable.
Why does my SNES look blurry on my CRT?
The most common cause is using the stock Composite cable. Upgrading to S-Video or RGB SCART will immediately sharpen the image. If you are already using S-Video or RGB and the image is still soft, check your CRT’s sharpness setting – many sets have this set too high by default which causes edge ringing and a blurry appearance. Try reducing the sharpness setting to zero and adjusting upward from there.
Do I need to mod my SNES to connect it to a CRT?
No – the SNES outputs S-Video, RGB, and Component natively without any modification. This makes it one of the most straightforward retro consoles to set up on a CRT. The only SNES-related mod worth knowing about for CRT gaming is the 1CHIP mod for certain SNES revisions that suffer from video noise on the RGB output – but this is optional and most SNES consoles produce an excellent image without any modification.
Can I use a modern TV for SNES instead of a CRT?
Yes, but the experience is notably different. Modern TVs add input lag, do not support 240p natively, and display SNES pixel art without the natural blending that a CRT provides. A RetroTINK 5X Pro solves most of these issues – for a full breakdown read our RetroTINK 5X Pro review. For the most authentic SNES experience a CRT remains the best choice in 2026.
The most important thing to remember when learning how to connect SNES to a CRT TV is that any working connection is better than no CRT at all – start with what you have and upgrade from there.
Ready to find the right CRT for your SNES setup? Read our guide to the best CRT for SNES gaming for specific model recommendations, and our complete CRT cables guide for everything you need to know about getting the best signal from your Super Nintendo.